Jump to:
How to Pass a Weld Test
In my journey as an instructor and inspector, I’ve monitored countless weld tests. More importantly, I’ve also taken many welding tests (known as welder performance qualification tests) during my career as a welder. These tests ranged from horizontal fillet welds to 6G ASME pipe tests. When the inspector certified my weld tests, I was qualified for production. My responsibility was to weld at a code-quality level in various production environments, on small and large weldments, and sometimes in awkward positions. I am often asked, “How do you pass a weld test?”
Certification vs. Qualification
Certification is the process of an authorized person monitoring a welder completing a weld test to ensure the weld is in compliance with the codes and welding procedure specifications (WPSs). Qualification is the process of the welder proving their weld meets the applicable code/standard under the guidelines of the code/WPS.
Several codes used today require certification. Codes are also designed to protect the public at large so as people walk across bridges, enter buildings, or fly across the country, there’s confidence the products are well built. Codes and standards require the testing of personnel, too.
Preparing for Your Test
First and foremost, do your research. What code are you going to be testing to? For example, AWS testing requirements are slightly different than ASME and API. Identify the hold points, the visual testing standards, and sample types and locations (e.g., face, root, or side bends). Find out if the test coupons will be evaluated using nondestructive examination. Knowing these details will help you strategize how you weld your test coupon(s).
Preparation is key to success in a weld test. Once your test is scheduled, plan ahead for what you will face. Will you be taking a shielded metal arc welding (SMAW), flux cored arc welding (FCAW), gas metal arc welding, or gas tungsten arc welding (GTAW) test? Will you need extra practice metal, more contact tips, or a GTAW kit? In my experience, having extra items will help you be ready for the test. Preparation goes a long way to calm nerves.
When arriving at the test site, introduce yourself to the inspector(s) and get a rundown of the equipment. Next, ask for the WPS. This will include base metal type, joint configuration, amperage and voltage ranges, allowed cleaning methods, and welding techniques (stringer or weave) for preheat/interpass/postheat requirements. This document may be provided by the test lab or the contractor. Follow it. Once settled in your area, it’s time to concentrate on the details.
Importance of Metal Preparation and Joint Fitup
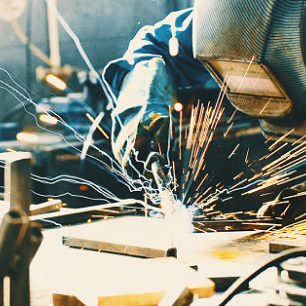
I cannot overemphasize that base metal preparation and fitup are important to passing a weld test (see lead photo). Time taken here will surely pay dividends in completing the weld. Be sure to grind/sand your test coupons. Preassemble your plates to ensure your fitup is correct. And finally, tack your plates securely with the fitup needed.
Making A Root Pass
This section focuses on the AWS D1.1, Structural Welding Code — Steel, welder qualification test on a 1-in.-thick plate.
The first pass in a weld test, known as the root pass, is the most critical. The last thing a welder wants to do is leave a flaw here. When completing the root pass on a single-V-groove weld with a backing strip, apply the following procedures:
- 1. Ensure the fitup is tight to the backing strip and both bevels are ground to a knife edge.
- 2. Set amperage high enough to produce a fluid but controllable pool. Your practice plates will assist you in adjusting the machine.
- 3. When applying the root pass, the main objective is to consume both knife edges of the beveled plates while fusing into the backing strip. With E7018, keep the electrode on the leading edge of the pool, and watch the leading edge carve into the base metal. I also focus on the lower sides of the pool (4 and 8 o’clock positions) to ensure the molten pool is filling that area without leaving undercut.
- 4. Another focus point is the arc length for E7018 or contact-tip-to-work distance (CTWD) for FCAW. With E7018, it is critical to monitor the arc length. Also, hold a tight arc. This translates into a 1/16-in. arc length for an 1/8-in. electrode. The key indicator is the globular transfer; if you see droplets start traveling across the arc, tighten up ever so slightly. This maximizes the shielding while still allowing you to work the pool to let it blend.
For E71T-1 (dual shield), carefully monitor the CTWD. At Portland Community College, we train with a 1/16-in.-diameter electrode with 100% CO2 shielding gas and utilize a ¾-in. CTWD. What’s important is that the ¾-in. CTWD is our starting point. While welding, optimize the arc to produce a smooth transfer while laying down a smooth bead by adjusting the CTWD ± 1/8 in.
It is important to ensure the root pass is thoroughly cleaned before beginning the second pass. This holds true for all subsequent passes as well. The WPS will state if power tools are allowed or if this cleaning is restricted to hand tools. Be sure to pay attention to these details.
This article was written by Matt Scott (welding instructor and department chair at Portland Community College, Portland, Ore.) for the American Welding Society.

Community and Events

Weld Wednesday
Our monthly podcast tackles a variety of welding topics for listeners in any position
within the industry.